

|
|
|
Page sections allow you to visually separate a set of fields within a profile screen by adding a header and applying a different number of columns to part of a profile screen. The page section layout applies until another page section is defined for the profile screen.
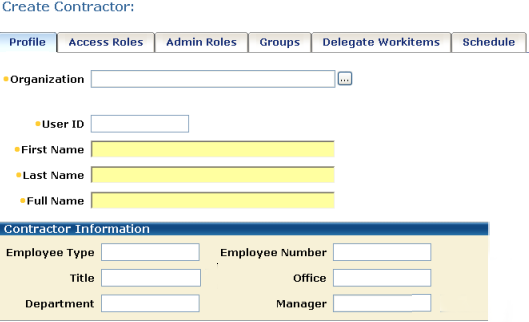
The following sample profile tab shows two page sections.
To add a page section
Identity Manager adds a new field above the field you selected. This field will indicate where the page section starts.
The Field Properties dialog opens.
Identity Manager adds additional fields to the Field Properties dialog.
Specifies the number of columns that the page section will contain.
After specifying the number of columns, click the right arrow icon to apply the changes. Once the changes are applied, additional fields appear that enable you to specify the width of each column.
Note: Each field includes two columns: one column for the field label, and one column for field values. To display two fields on a single row, add four columns.
Specifies the text that appears above the page section as a heading.
Determines whether users can choose to hide a page section. When this option is selected, Identity Manager adds an arrow icon in the table header that allows them to show or hide the page section.
Specifies that a page section is hidden by default.
If users should be able to use the page section, be sure to select the Enable Hide/Show Buttons option when you select the Hide Initially option to allow users to show the page section.
Determines the width of each column in the page section. Each column width is specified as a percentage of the profile screen.
For example, to add four columns of equal width, you would specify each column width as 25%.
Note: The total width of of columns must be 100%.